Reference#
This part is still under construction.
You have your OER in different output formats, complete with your own content and metadata and it is even already indexed in oersi, but you want to learn more about what you can do with this template?
In this part of the tutorial, we highlight further configuration options, Markdown basics, workflows in GitHub and much more.
Configuration options#
In the repository, there is a file called
_config.yml. This gives you many configuration options. For all options, head to the Jupyter Book configuration reference.
You do not have to set values like title or author, since they are automatically replaced with the values from the metadata.yml file.
Markdown#
For a good overview on what Markdown is and what you can do with it, you can check out the Markdown guide from Matt Cone:
Headings#
To create a heading, add number signs (#) in front of a word or phrase. The number of number signs you use should correspond to the heading level. For example, to create a heading level three (<h3>), use three number signs (e.g., ### My Header) [1].
Heading level |
How to write it |
How it looks |
|---|---|---|
Heading level 1 |
# Heading level 1 |
Heading level 1 |
Heading level 2 |
## Heading level 2 |
Heading level 2 |
Heading level 3 |
### Heading level 3 |
Heading level 3 |
Heading level 4 |
#### Heading level 4 |
Heading level 4 |
Heading level 5 |
##### Heading level 5 |
Heading level 5 |
Heading level 6 |
###### Heading level 6 |
Heading level 6 |
Markdown elements#
Element |
How to write it |
How it looks |
|---|---|---|
Bold |
**Bold text** |
Bold text |
Italic |
*Italicized text* |
Italic text |
Blockquote |
> blockquote |
To be seen at the top of this section |
Ordered list |
1. First item |
1. First item |
Unordered list |
- First item |
- First item |
Code |
`code` |
|
Horizontal rule |
— |
— |
Link |
[Link text](link url) |
|
Image |
 |
[1] Matt Cone, markdownguide.org, Basic Syntax
Links to other sections#
You can link to sections within your document using the link syntax shown in the table above. The links are generated from the heading:
# Heading->#heading(You can reference it like this:[Heading](#heading))# Heading 1->#heading-1### Lower heading level!->#lower-heading-level
You can also set custom links like this:
## My heading {#custom-id}
Now the link to this section is #custom-id.
Git#
Here, you will only find a very brief overview of Git. If you want to learn more about Git, You can find an abundance of free tutorials, books and videos about Git, how it works and how to use it online. We highly recommend to check out the free online open textbook Pro Git.
What is Git and why should you use it?#
Have you ever worked on different versions of a document, or even with different people? Then you likely know how hard it is to keep track of changes, and how easy to accidentally overwrite them. Git is a tool that helps with that. It is a so-called version control system. To learn more about version control, you can check out the Version Control section of the Pro Git book.
By playing the video you agree to YouTube retrieving and storing information about you in the form of cookies.
How Git works#
Git is used to keep track of changes of the files inside your repository. Once you add a file to git, it is tracked. Git now automatically detects whether the file was modified or not. You can then stage files and add them to a commit. All these commits form your history, you can see which changes were made when by whom and you can even revert files back to specific commits.
It is also possible to have multiple branches. You start out with one branch, usually called the main or master branch. However, at any given time from any branch, you can create a new branch. There, you can change files without anything on the main branch being affected by it - you are basically working in parallel, as if you copied your entire repository some other place, but much more efficient. Plus you can easily switch between branches and merge changes of one branch into another. This makes it easy to not only have one stable version on the main branch while changing things on other branches, but also to collaborate with others and not have each other’s changes overwrite anything.
Working on different branches and eventually merging them can lead to merge conflicts. Merge conflicts arise when there are two changes to the same lines of a file. They are resolved by choosing which changes to keep or by bringing them together manually.
By playing the video you agree to YouTube retrieving and storing information about you in the form of cookies.
Working offline#
In this tutorial, we work online the entire time. We create all files directly on GitHub. Another way of working is to work offline in a local folder on your computer and then uploading your files to a git repository. This, however, requires some knowledge about Git and a text editor.
Since we are working with Git (see Git section for more information), and want to publish our content on GitHub (see GitHub section), we have to find a way to bring our offline work online. For this, you should check out the Git section.
Editors#
You know text editors like Word or LibreOffice. However, we want to use plain text that is readable for machines. This is why we are working with Markdown to format our plain text.
There are a lot of editors that help you with writing text using the Markdown syntax. They use syntax highlighting to better understand the structure of Markdown and can provide a live preview as you type.

The editor you can see in the screenshot is called VSCodium, which is the open source version of a popular editor VSCode by Microsoft. In this editor, you can install plugins that can help you. For example, you can install a plugin that can render a preview of your LiaScript course in your browser without having to upload your changes. It also has a built-in Git functionality which helps you publish your changes.
Put your changes online#
You could upload your locally edited files to GitHub, either by simply uploading this file or by editing the file you want to change and replacing that file’s content with your local content.
The better way, however, is to use Git for this - either by using your editor’s built-in Git functionality or by using the Git program itself. Please check out the abundance of free online resources on how to do this.
By playing the video you agree to YouTube retrieving and storing information about you in the form of cookies.
Immediate update in OERSI#
Your OER will be automatically inserted into the OERSI if you fulfill the requirements listed in the insert your OER into OERSI section. The resources are updated each night. If you want to see immediate changes, you can use the (experimental) record updater.
Head to the record updater page on oersi.org. Insert the link to your GitHub repository or to the generated landing page of your OER.
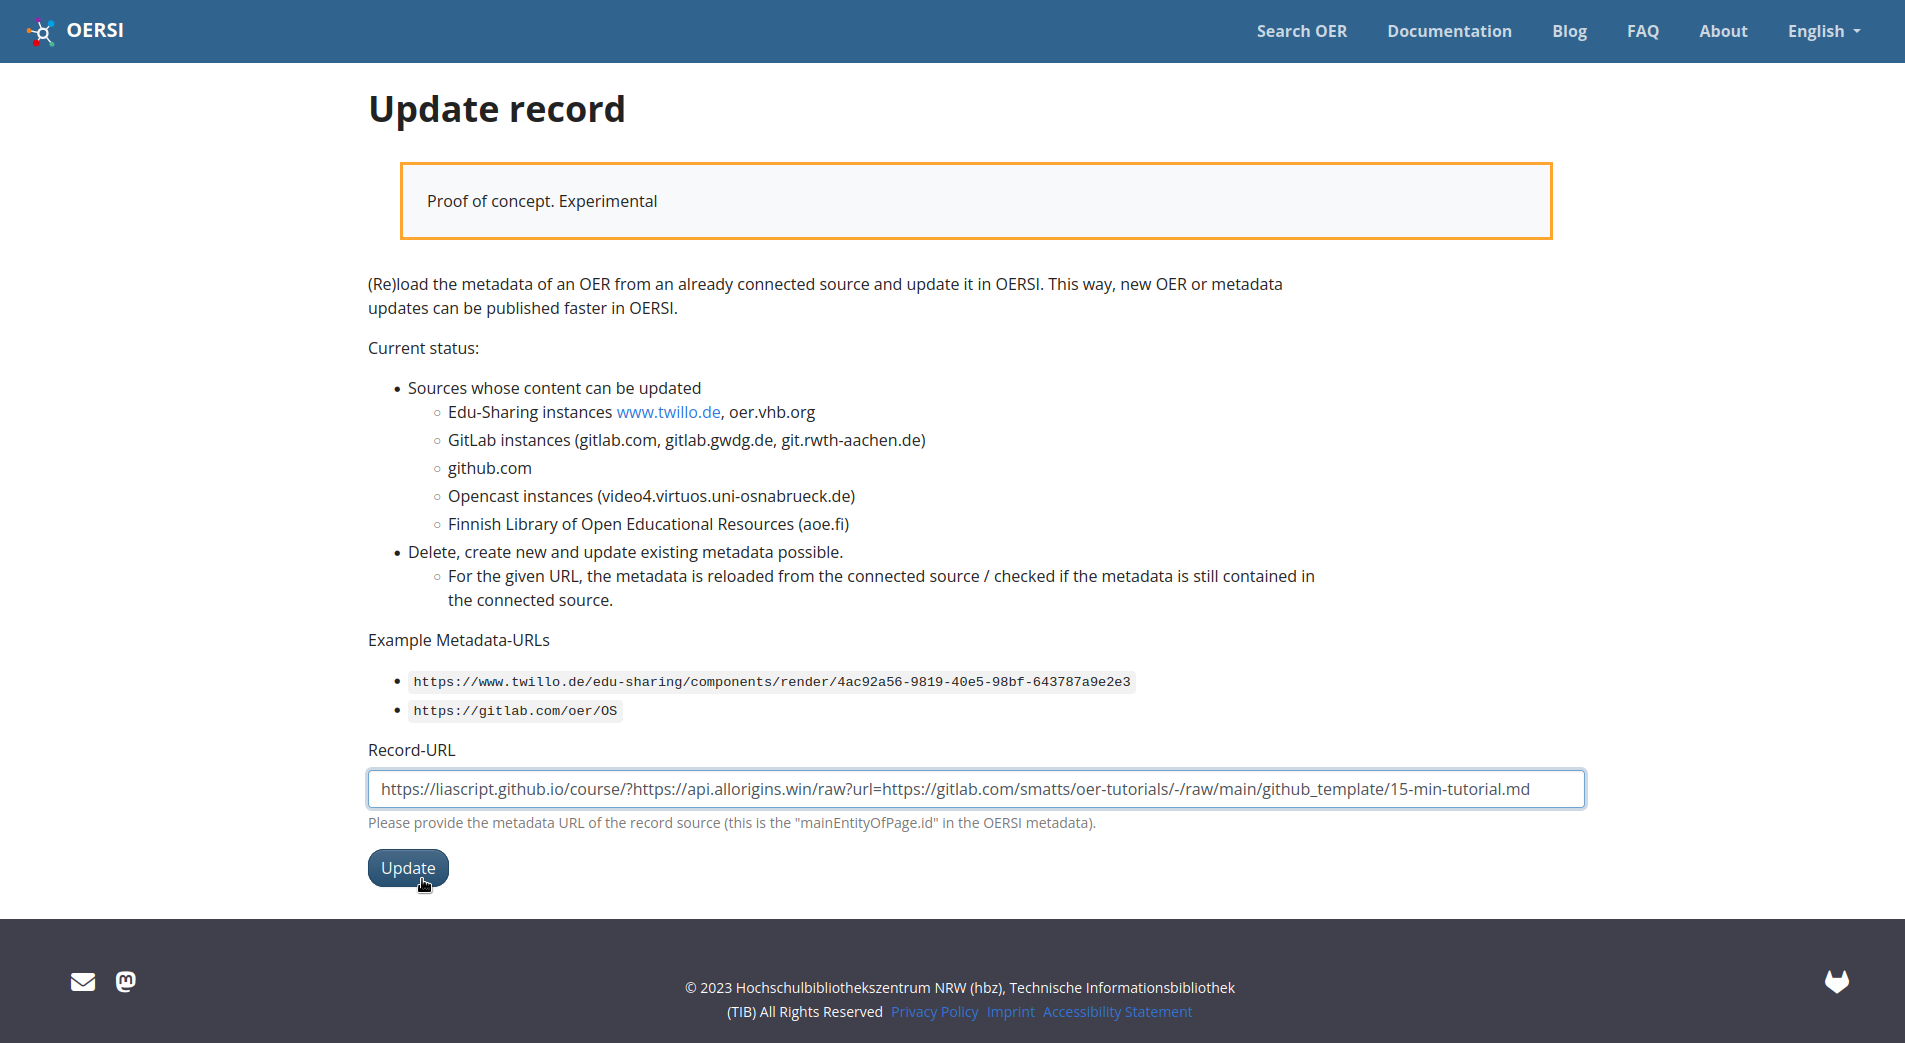
Then, click on update. Your OER should now be updated in the OERSI.
Different formats#
After following this tutorial, you have an OER in a book format. We could, however, generate all kinds of different formats, for example a course format like this tutorial.
Using this template is not the only option to host OER using GitHub. For example, this tutorial runs using JupyterBook. Moreover, you don’t have to use GitHub as your hosting platform - other Git-based platforms like GitLab can be used, too (it is however necessary for most of the formats to have some sort of automated CI pipeline included in the Git hoster). We currently don’t have templates with automated generation for other platforms, though.
Below you find a short list of several possible formats your OER could use.
Markdown documents template#
This is the template that is described in this tutorial. As you know by now, it takes your Markdown files, puts them together and generates different formats from them. These formats are linked to and can be downloaded from the landing page that is generated using GitHub Actions and GitHub Pages.
✅ |
Easy setup with our template |
✅ |
Automatic generation of different formats |
✅ |
Can include interactive elements |
✅ |
Always have the newest changes online |
✅ |
GitHub automatically tracks changes made to your files |
✅ |
Easy collaboration with others on GitHub |
✅ |
Customizable with CSS |
❌ |
Needs a GitHub account |
❌ |
Customizing can be tricky / Limited page layout customization ? textfluss gestaltung |
Markdown slides template#
The Markdown slides template is very similar to the Markdown documents template from this tutorial. But instead of creating a single text document, the slides template creates several slides. For this, you create one Markdown file for one set of slides and the template generates the slides in both HTML and PDF format and shows a list of all generated slides together with preview images in a GitHub Page.
✅ |
Easy automatically generated slides in two formats |
✅ |
Easy setup with our template |
✅ |
Automatic up to date overview page |
✅ |
Always have the newest changes online |
✅ |
Automatically tracks changes made to your files |
✅ |
Easy collaboration with others |
❌ |
Slides are only partly customizable |
❌ |
Needs a GitHub account |
LiaScript#
LiaScript takes a markdown file and automatically generates a course format from it. The tutorial you are currently viewing is actually made with LiaScript! Or rather, the Markdown file this tutorial is written in is being interpreted by LiaScript, which therewith generated this course. So all you really need is a Markdown file.
✅ |
Super easy to set up, just need one markdown file somewhere on the internet! |
✅ |
Runs everywhere |
✅ |
Large number of elements you can use like: … graphen, tabellen, karten, … |
✅ |
No installation, everything happens live & online |
✅ |
Easy to click through the different sections |
✅ |
Automatic translation into many different languages |
✅ |
Interactive elements and extended Markdown can be used |
✅ |
responsive website, good mobile view |
❌ |
Only online, no download |
❌ |
Depends on one single service |
❌ |
Only one Markdown file at a time |
Static Site Generators#
A static site generator generates a static site. Typically, it will be possible to also write your content using Markdown, but at the same time, you will be able to edit your layout and include more elements yourself which the static site generator then uses to create your web page. Of course, this requires some basic knowledge about HTML, CSS and the static site generator you are using. You should also be familiar with the command line or using GitHub Actions yourself.
✅ |
Creates a lightweight web page |
✅ |
Very customizable |
❌ |
Not automatically responsive |
❌ |
Not for complete web dev beginners |
❌ |
Takes longer to get a first version running / more configuration and technical know-how necessary |
JupyterBooks#
Jupyter Book is a free and open source tool to create online books. You can create sections and subsections that you can click through. They are added to a table of contents, which can be viewed in a sidebar or accessed via a menu. It is also possible to include executable content. Moreover, you can download your book in both Markdown and PDF format. You can start out with a template supplied by the software itself.
✅ |
Creates online books with sections and table of contents to click through |
✅ |
Allows lots of configuration and structuring |
✅ |
Supplies download as Markdown and PDF |
✅ |
Can include executable content |
❌ |
Not for complete beginners (you will need to run commands from the command line or create a GitHub Action) |
❌ |
Configuration is done via config files, which can be tricky to learn if you are unfamiliar with coding |
Troubleshooting#
Something does not work? Maybe you find your issue right here.
I do not see my changes#
You have added your content and your metadata but can not see your changes in your landing page and generated documents? Following these steps might help you.
Delete your cache and reload your page/document
Often, the old version of the page is still loaded in your browser’s cache.
If you reload the page or document by hitting Ctrl + F5 together, you can reload your page while deleting the cache of that page.
You can also open your page or document in a new private tab or window, as the browser usually does not use its cache there.
Check your file names and content
Check if your file name contains characters like spaces. These are not allowed and cause the document generation to break.
Also, ensure that there are no special characters like emojis or other unicode characters in your documents. Our document processor does not understand these characters, which also leads to breaking the document generation.
Check your media
Sometimes, images or videos can cause the document generation to break.
Usually, this happens when you use an unsupported format. Stick to widespread formats like png and jpg to be sure.
FAQ#
Can I upload non-text files like PDF files?#
Yes, you can! Git however won’t be able to track changes made to those files, it can only track that it was changed.
Why are the direct paths to my files different?#
You may have encountered links containing https://raw.githubusercontent.com/. If you are wondering what this means and why GitHub changes your URL this way, the reason is the following:
When you go through your repository’s files in GitHub, you see them embedded in the GitHub web page, which lets you do several things like edit, delete, show its history and so on. So when you have a link to this file, the link points to this web page and not to the file itself (which is called the raw file). If you want to access the file only, so the raw file, GitHub allows you to do that by changing the URL to https://raw.githubusercontent.com/.
How can I create a new folder?#
You can not create an empty folder. This means you have to add files in GitHub in that new folder. Either create a new file and change the path to that new folder (i.e. instead of creating a new file file.md, write it with a new folder like newfolder/file.md, a new folder will be automatically created) or upload a non-empty folder.